Bass and Dry Lakes: Hiking with Dogs Near Ely, Minnesota

If you’re looking for a dog-friendly hike near Ely, Minnesota, Bass and Dry Lakes Loop delivers plenty of reasons to hit the trail. This 6.7-mile loop winds through a mix of forest and rocky terrain in the Superior National Forest, with multiple vistas across Bass and Dry Lakes and opportunities to get down to the water.

Lu and I hiked the loop during a September weekend trip to Ely. It’s a longer hike with some rugged footing, but the lake view and waterside exploring made it well worth the effort. Here’s what to know before hitting the trail with your dog.

Lu explore along Dry Lake

Bass and Dry Lakes Loop at a Glance

Location: Ely, MN
Distance: 6.7 miles
Elevation Gain: 427 feet
Difficulty: Moderate
Route Type: Loop
Estimated Hiking Time: 3 hours
Terrain: Rocky, uneven, roots, dirt, and sand
Water Features: Lakes and lake access
Dog Access: Leashed dogs welcome
Best For: Northwoods scenery and dogs who love water
Biggest Consideration: Longer distance and rocky footing

Bass and Dry Lakes trail map
These stats are unique to my hike. Your experience may vary.

My Experience Hiking Bass and Dry Lakes Loop with Lu

Lu and I spent a weekend in Ely in late September, basing out of Bear Head Lake State Park. This was our second hike of the weekend. We set out for a morning hike but were delayed until noon by a marathon that had Echo Trail closed to traffic.

We hiked the big loop counter-clockwise, following the trail around Bass Lake, Dry Lake, and Little Dry Lake. The trail was rockier than I expected in places, but Lu handled it without any trouble. She loved the lakes and took advantage of every opportunity to get in the water. Between the lake views and the varied terrain, she seemed to think this was a pretty good way to spend an afternoon.

We met one pair of hikers at the first major Bass Lake overlook, then we didn’t see anyone else until we neared the Little Dry Lake. There were quite a few people heading out in the opposite direction as we finished our loop.

Lu on the Bass and Dry Lakes Trail

What to Know Before You Go

One of the interesting things about this hike is the geology beneath your feet. Part of the trail follows a ridge formed by the Vermilion Fault, which creates some of the overlooks above Bass Lake. You’ll also cross ancient Ely Greenstone, granite, and sandy deposits left behind by an old lake. There’s more to this landscape than just the lakes and forests.

Hiker sign on the Bass and Dry Lakes Loop trail

Route and Distance

I tracked our hike using Gaia GPS and recorded 6.68 miles for the full Bass and Dry Lakes Loop.

The Bass Lake Trail system offers several shorter hiking options if you don’t want to tackle the full loop:

  • Dry Falls – 1.6 miles round trip
  • Dry Lake Loop – 3 miles round trip
  • Bass Lake Loop – 5.3 miles round trip

Terrain and Difficulty

The Bass and Dry Lakes Loop crosses a mix of terrain, including dirt, rocks, roots, exposed rockface, loose stones, and sand. Some sections require a little more attention to your footing, especially when hiking with a dog on-leash. While I’d still classify this as a moderate hike, the rocky terrain makes it more challenging than a smooth footpath.

A rocky foot path on the Bass and Dry Lakes Loop

Water Access

While some of the overlooks sit high above the lakes, there are several places where you can reach the water. Lu waded into every body of water she could get to. It may have been the end of September, but it was still warm enough that I was wearing shorts and Lu was happy for a chance to cool off.

Lu taking a dip in the water

Dogs and Leash Requirements

Dogs are welcome on the trail but must be kept on a leash.

Parking and Trailhead Access

The Bass Lake Trailhead is about 10 minutes from Ely on a paved road with a paved parking lot.

From Ely on Hwy-169, you’ll head up County Road 88 (Grant McMahan Boulevard) and turn onto County Road 116 (Echo Trail/Ely-Buycks Road). After about 2.5 miles, you’ll reach the Bass Lake parking area on the right. There are about 25 parking spaces.

A short path leads from the parking lot to a bathroom and a trail map kiosk with basic information about the trail. Note, there is also a backcountry bathroom at the far end of Bass Lake.

Bathroom sign mid-hike

Best Time to Hike

Late spring through fall is generally the best time to hike this area, although conditions can vary. If you’re hoping to catch fall colors, late September through early October is a good time to plan a visit. That’s when Lu and I hiked the loop, and the colors were just starting to show at the end of September.

What I’d Bring

Bring good hiking shoes, plenty of water, snacks, and your usual day-hiking essentials. The trail has several great lake overlooks that make excellent spots to stop for a snack and enjoy the views.

If your pup likes to jump in the water, stash a towel in your car to dry them off once you finish the loop. Lu is a water dog at heart, so I always keep an extra towel in the campervan just for her.

Lu in Bass Lake

Would I Take My Dog Again?

Absolutely. I loved this hike, and it has all of the good stuff you’d want in a Northwoods hike. There’s a beautiful forest, plenty of lake views, and opportunities for dogs to get in the water. The trail is rugged in some places, and it’s a longer hike, so I’d make sure you and your dogs are comfortable covering the distance and navigating the rocky terrain.

Make a Day of It: Things to Do Near Ely

Additional hiking:

  • Trezona Trail – 3.9 miles round trip, easy
  • Blackstone Secret, and Ennis Lakes – 4 miles round trip for the biggest loop, moderate
  • Kekekabic Trail – 21 miles one way, hard (you can turn it into a shorter out-and-back as needed)

Waterfalls: Kawishiwi Falls is a short, easy 0.8-mile hike to where the falls flow from Garden Lake into Fall Lake.

Local camping: Bear Head Lake State Park is a beautiful campground with hiking trails and lake access. Leashed dogs are welcome in most outdoor areas, with restrictions in buildings and at the swimming beach. We camped at drive-in site 21, and it was fantastic!

Camping at Bear Head Lake State Park

Dog-friendly patio: Frisky Otter Pub & Eatery serves everything from breakfast to dinner, and well-behaved, leashed dogs are allowed on the patio. They have their own doggy dinner menu!

A hit of caffeine: Northern Grounds is a women-owned coffee shop and wine bar with a handful of breakfast items, sandwiches, and bakery treats. Dogs aren’t allowed inside, but you can get your goodies to-go for a mid-hike snack.

Post-hike beer: Boathouse Brewpub & Restaurant is a local brewery with the classic burgers and sandwiches type of food. Dogs aren’t allowed inside, but you can get a growler to take home or to your campsite. Try the Blueberry Blonde Ale!

Blueberry Blonde Ale at Boathouse Brewpub in Ely, MN

Unique adventure: International Wolf Center is a science-based education center offering interactive wolf presentations. Dogs aren’t allowed inside, but it’s a worthwhile stop if you want to learn more about one of the Northwoods’ most iconic animals.

Bass and Dry Lakes Loop is a great way to spend a few hours exploring the Northwoods near Ely. Between the rugged trail, scenic lake overlooks, and opportunities for dogs to get into the water, it’s a hike I’d happily do again. And with plenty of other trails, outdoor adventures, and dog-friendly stops nearby, it’s easy to turn a visit into a full weekend.

Have you visited Ely, Minnesota? What are your favorite dog-friendly trails and activities? Share your inspiration for our next trip in the comments!

11 Best Dog-Friendly Fall Hikes on Minnesota’s North Shore (Hidden Gems Included!)

Discover the best dog-friendly fall hikes on Minnesota’s North Shore—popular trails, hidden gems, and tips for planning the perfect leaf-peeping trip.

Minnesota’s North Shore is a breathtaking destination in autumn, the perfect place for dog lovers looking to enjoy crisp fall air and stunning scenery. This region offers some of our favorite dog-friendly hiking trails in the state. From cascading waterfalls to cliffside overlooks, these trails provide unforgettable outdoor adventures for humans and their four-legged companions.

Most trails on the North Shore welcome leashed dogs and promise memorable experiences amid the beauty of fall. This guide highlights the top trails (and our favorite hidden gems!), tips for hiking with dogs, and everything you need to plan the perfect fall adventure together.

A cute pit bull on a dog-friendly trail with fall colors in the background on Minnesota's North Shore

I may earn a commission or revenue on some items through the links below. This does not affect your price or savings. I appreciate your support!

Top Dog-Friendly Hiking Trails on Minnesota’s North Shore in Fall

Head out on these tried-and-true North Shore treks to take in Minnesota’s most iconic fall views—golden maples and Lake Superior vistas so pretty your dog might actually stop and stare (or at least sniff with enthusiasm)—and for good reason.

A dog posing amid the fall colors on a dog-friendly trail in Minnesota

Eagle Mountain (BWCAW)

6.6 miles, out-and-back

Head into the Boundary Waters Canoe Area Wilderness (BWCAW) for an expedition to Minnesota’s highest point. You’ll trek over long boardwalks, tangled roots, and rocky footpaths to reach two stunning overlooks and the Eagle Mountain summit at 2,301 feet.

Lu loved climbing up and over the rocks on the second half of this trail (from the lake to the summit), but not all dogs (or humans) may be up for this type of hike.

You’ll need a free day-use BWCAW permit at the trailhead, and don’t forget the snacks—this one’s a workout for both two and four legs.

Pincushion Mountain (Grand Marais)

4.1 miles, out-and-back

A hike known for sweeping Lake Superior views and colorful leaves, your destination is the summit of a steep rock lookout. It’s a bit of a workout, but the payoff? A bald summit with jaw-dropping views.

A pit bull standing on Pincushion Mountain overlooking the forests on the North Shore

Oberg Mountain (Lutsen)

2.3 miles, lollipop loop

Short, sweet, and packed with views, this loop is a North Shore classic for fall color. Expect stunning panoramic views of Lake Superior, Oberg Lake, and fiery red maples. In 2025, the leaves here turned early, so keep an eye on color predictions if you’re planning a visit!

Fantasia and Johnson Overlook

4.7 miles, out-and-back

Choose this adventure for a challenging ascent along the Superior Hiking Trail with views of Lake Superior. After the big lake views, you’ll dive back into the forest to reach two quiet overlooks at Fantasia and Johnson Lakes.

This one is a bit of a climb, so pack water and prepare for some uphill tail wags. We recommend hiking early on a hot day, as there is no lake access on this hike.

A pit bull sitting in front of an overlook of a lake a forest in the North Shore

Bean and Bear Lakes (Silver Bay)

6.8 miles, lollipop loop

You’ll trek about nearly 7 miles round-trip through the forest to a viewpoint overlooking the perfectly aligned Bean and Bear Lakes. This hike surged in popularity as the view gained traction on social media, but it’s still a worthy challenge despite the weekend crowds.

Lookout Mountain (Cascade River State Park)

4 miles, out-and-back

The trails along the river are the most popular sections in this park (justifiably with the cascades), but this summit is a worthy addition, especially in Autumn. We’ve hiked this trail several times, and Lu always loves the water access at the river mid-hike. You’ll enjoy a swift climb through mixed hardwoods, and the contrast of evergreen and golden aspens makes for a gorgeous reward at the summit.

Carlton Peak (Temperance River State Park)

6.8 miles, out-and-back

Temperance River is a fall favorite for a reason. Start at the popular river section, then head inland and uphill to one of the best summits on the North Shore for sweeping fall views.

Tip: Temperance River is one of our favorite campgrounds, especially the Lower Campground, where you have easy access to Lake Superior. Stay here overnight and head up to Carlton Peak for sunrise and the ultimate morning dog walk.

A waterfall at Temperance River State Park in Minnesota

Hidden Gems: Dog-Friendly Trails on Minnesota’s North Shore

Looking for something special and with fewer people on the trail? Check out these beauties! They’re truly some of our favorite dog-friendly hikes on Minnesota’s North Shore. Yes, even compared to some of the top hikes listed above.
These trails are perfect for pups who prefer quiet woods to crowded overlooks and for humans who love a little extra elbow room during leaf season.

Split Rock River Falls (Split Rock Lighthouse State Park)

5 miles, out-and-back

Tucked away on the lesser-visited side of the park, this riverside trail follows the Split Rock River up past waterfalls and rocky ledges. It’s a moderate climb with just enough challenge to make it feel like you earned those stunning river views. There are even a few spots where your pup can hop in the river on a warm day.

A rocky riverbed surrounded by pines on the Split Rock River Trail, a great fall dog hike on Minnesota's North Shore

Magnetic Rock (Gunflint Trail)

3 miles, out-and-back

This one’s a bit of a drive, but it’s worth every mile of winding fall color along the Gunflint Trail. The payoff? A massive 60-foot-tall magnetic monolith that’s basically North Shore sci-fi. Add in the fall foliage along the wetland overlooks, and you’ve got the makings of a perfect geology-meets-leaf-peeping adventure.

Bring a magnet if you want to test the rock—your dog will probably be more interested in sniffing every nook and cranny, but, hey, science is fun.

A woman and dog sitting on a rock ledge on the dog-friendly magnetic rock trail

Centennial Trail (Gunflint Trail)

3.3 miles, loop

Hop just across the road for this fun loop along portions of an old railroad bed—history, solitude, and sweet forest views. There’s one steep portion where your pup might need a hand stepping down a rock ledge (or a dramatic leap if your dog is like Lu!). Easygoing with just a hint of challenge, this hike is the perfect adventure.

A dog hiking in the fall foliage on centennial trail in Minnesota

Palisade Valley (Tettegouche State Park)

6.6 miles, out-and-back

Skip the Tettegouche State Park visitor center and head to the Lax Lake Road entrance to unlock a quieter, deeper part of the park. Several overlooks pepper this rambling adventure, so don’t forget your camera and a sense of awe. We hiked this one on a foggy day, and even with a whiteout at some overlooks, the hike did not disappoint. Dogs don’t care about fog anyway—they’re just here to be with you!

A woman looking out a the fall foliage in Palisade Valley on Minnesota's North Shore

BONUS: For an even bigger, more challenging expedition, continue on to summit Mount Trudee. It’s not for the faint of paw, but it’s worth it if your pup has a bit of mountain goat energy. Lu loved hopping up more rocks!

A woman and dog looking out at the fall colors from Mount Trudee, one of the best fall dog hikes on Minnesota's North Shore

Additional Dog-Friendly Outdoor Activities on the North Shore

Need a break between hikes? Here are a few more dog-friendly activities to add to your fall hiking adventure.

Lutsen Gondola

Yup, your pup can ride the Lutsen Gondola—and no, they don’t need a ticket (but they might want the window seat!). In the fall, you can hop a ride on the gondola for a spectacular leaf-peeping ride to the top of the mountain (about 8 minutes). Tickets are required and can be purchased online.

State Park Camping

Think about it: If the trails look fantastic in the falls, so will the campgrounds spread throughout those same forests along the North Shore. Pick up some firewood at the ranger stations and enjoy a cozy evening around a campfire.

Pie, Craft Beer, and Pasties

There’s no shortage of good drinks and eats along Highway 61 heading up the shoreline. Most of these places are dog-friendly (outdoor patios), so you don’t have to leave your sidekick behind while you sip or snack. Some spots to check out: Betty’s Pies, Castle Danger Brewery, Coho Café & Bakery, and Schroeder Baking Co.

FAQs: Dog-Friendly Fall Hiking on the North Shore

Two dogs posing for a photo amid the orange fall leaves in northern minnesota

When is Peak Color on Minnesota’s North Shore?

Peak fall colors typically hit between the last week of September and the first week of October. Check the Minnesota DNR fall color tracker for up-to-date info. Inland hikes like Oberg Mountain often change earlier than shoreline trails.

Can I Hike with My Dog Off-Leash on the North Shore?

Most trails on the North Shore, especially those in state parks, within the BWCAW, or on the Superior Hiking Trail, require dogs to be on a leash no longer than 6 feet. Even if leashes aren’t required in some areas, we always recommend leashing your pup for their safety and the protection of wildlife and other hikers. Your dog may be friendly, but not all dogs or people are comfortable with strange pets approaching them.

A woman taking a mid-hike selfie with her dog

Do I Need a Permit to Hike with my Dog in the BWCA or State Parks?

A special permit isn’t required for dogs, but you do need a self-issued, day-use permit for hiking in the BWCA. For the Eagle Mountain Trail, there are permits at the trailhead map kiosk (they’re free!).

A state park vehicle pass is required for parking in Minnesota’s state parks and trailheads. Passes are available online and in person, both as a year-long pass or a day pass. For example, you’ll need a pass to park at the Tettegouche State Park Lax Lake trailhead for the hike to Palisade Valley.

Tips for Hiking with Your Dog in Fall Weather

Fall on the North Shore is magical, but it can also throw a bit of everything your way: sunshine, rain, mud, wind, surprise sleet (we’ve seen it all before noon). Before you and your pup hit the trail, a little prep goes a long way to keep you all happy and safe all the way back to your car.

A woman and dog hiking a dog-friendly trail among the fall colors in Minnesota

Here’s how to make your fall hikes as comfortable and safe as they are beautiful:

Protective Gear: Layer Up Like a Pro (Yes, Your Dog Too)

That crisp fall air? It can turn extra chilly if the wind picks up or the clouds roll in. Pack rain coats and warm layers for you and your dog to keep everyone warm and dry. Your collie might laugh at the cold; your pit bull, not so much.

Hydration: Don’t Forget Water (Even if It’s Not Hot)

Just because it’s cool out doesn’t mean you or your dog won’t get dehydrated. Bring plenty of fresh water and a portable dog bowl for your canine companion.

Wood Tick Check (It’s Not Just for Summertime)

Yes, ticks are still out in the fall, especially in leaf litter and tall grasses. Keep your dog up to date on their tick prevention and do a thorough check after every hike. Don’t forget your own ankles, too. Ticks love socks. Weirdos.

Post-Hike Care

Muddy trails, sharp rocks, sneaky burrs—your pup’s paws go through a lot. Keep an old towel in the car to wipe down your dog after each hike. Check paws and between the toes for cuts, burrs, and ticks. A clean pup = a clean car (well… cleaner).

Check out our list of favorite gear for traveling with your dog!

Know the Signs of Canine Hypothermia

It’s rare, but if your pup gets too cold and wet, hypothermia is a risk. Watch for shivering, stiff or clumsy movements, lethargy, confusion, pale gums, and cold extremities. If in doubt, head for warmth and dry gear. You can always hike another day!

Know Your Dog’s Limits

Every dog is different. Some are ready to hike Mount Trudee twice before breakfast; others are done by the first overlook. Adjust your route, pace, and layers based on your pup’s breed, age, abilities, and attitude about mud puddles.

Remember: just because a trail is beautiful doesn’t mean your dog wants to summit it in sideways rain.

Two dogs standing in the doorway of a campervan

Trail Conditions Matter (and Change Fast)

Fall weather along Lake Superior can change in a snap. Check the forecast before you go and scope out recent trail conditions if possible (check trail reviews on AllTrails or in Facebook hiking groups). Mud, ice, and downed leaves can make even an easy trail feel like a slip-and-slide.

Final Thoughts on Hiking the North Shore for Fall Foliage

There’s a reason people (and pups) flock to Minnesota’s North Shore every fall—the scenery is nothing short of epic. Golden birch leaves, bold red maples, the shimmer of Lake Superior, and crisp air make our spirits bounce a little higher.

That said, fall is also peak season, which means planning is key to making your hike feel like a peaceful escape rather than a game of trailhead musical chairs (parking lots were overflowing during our most recent fall visit!).

Here are a few tips to help you and your four-legged friend get the most out of leaf-peeping season:

Hike Midweek

If your schedule allows, aim for Monday through Wednesday. Trails are noticeably quieter, and you’re more likely to snag parking, solitude, and that perfect overlook selfie without 12 other people and a random hiking pole in the frame.

a woman and a dog hiking among larch trees in minnesota

Arrive Early

Sunrise hikers, this is your moment! Trailheads fill up fast between 9 and 10 am, especially on weekends. If you can manage a sunrise start time, you’ll get cooler temps (on that rare warm fall day), flowing morning light, and a better chance of having the trail to yourself (well, plus your dog).

Skip the Most Popular Trails (Sometimes)

Yes, Bean and Bear is a stunner. But if you’re not up for a crowd, there are plenty of gorgeous alternatives nearby. Don’t sleep on the hidden gems—your dog certainly won’t.

Plan Around Peak Color, But Stay Flexible

Peak fall color usually hits between the last week of September and the first week of October. But it varies by elevation, distance from the lake, and the weather that week. Check the Minnesota DNR’s fall color map for the transitions of previous years and estimate the upcoming colors during your trip.

And if you miss the peak? Don’t worry. The golden larch and late-season yellows are still absolutely worth the trip.

A woman petting her dog, both in warm layers, on a trail amidst the golden larch trees

Whether you’re chasing golden leaves, quiet trails, orjust a weekend of happy tail wags, Minnesota’s North Shore delivers in full color. So, pack up the treats, leash up your adventure buddy, and hit the trail.

Have you visited the North Shore before? Did we miss any of your favorite fall hikes? Drop your tips or trail recs in the comments—sharing is caring (especially when it comes to good hikes, good dogs, and snacks).

Tettegouche State Park: Best North Shore Hikes and Camping

Venture up Lake Superior’s North Shore to visit Tettegouche State Park’s rocky cliffs, stunning waterfalls, and thick forests. Hikers, photographers, and nature lovers flock to this park for its pristine landscapes and outstanding views. I’ve stayed here several times to enjoy the park and as a home base while exploring more of the North Shore. Here’s my Tettegouche State Park guide to help you plan an extraordinary trip to this magnificent space.

A woman and two pit bulls are standing by pine trees at the end of a cliff in overlooking Lake Superior at Tettegouche State Park

This article contains affiliate links. I may earn a commission or revenue if you purchase an item through these links. This does not affect your price or savings. I appreciate your support!

Visiting Tettegouche State Park

Tettegouche, pronounced tet-uh-goosh, covers 9,300 acres of forests, cliffs, and rivers along Lake Superior’s shoreline. It’s rugged and wild and one of my favorite places on the North Shore.

Make the Tettegouche Visitor Center your first stop:

  • There is a lot of parking and great bathrooms if you need a break.
  • Stop by the coffee shop in the gift store to grab a latte, an ice cream cone, or a souvenir.
  • Check out the art and informational exhibits.
  • Sit by the fireplace or picnic areas for a cozy snack break.
  • Purchase a park pass (required to park in any MN state park)
  • Check in with a park ranger if you’re camping in the park.
  • Ask rangers any questions you may have before exploring the park.
  • Purchase firewood for a campfire at your campsite.
  • Walk down to the Lake Superior beach.
  • Pick up a Tettegouche trail map, then hit the trails!

The Tettegouche State Park office is open 9 am-4 pm daily. The park is open 8 am-10 pm daily.

Best Hikes at Tettegouche State Park

Tettegouche State Park has some of the best hikes in Minnesota. Trails vary in difficulty, from Shovel Point’s easy pathway to the brisk climb up to High Falls, the tallest waterfall in the park. Each of these northern Minnesota hikes welcomes leashed dogs!

Shovel Point

1.2 miles, out and back

Hike the Shovel Point Trail to kickstart your adventures around Tettegouche. You’ll set out from the visitor center and wind along the cliffs overlooking Lake Superior. From the platform at Shovel Point, you’re treated to outstanding scenic overlooks of Lake Superior and Palisade Head.

This is the first hike I do every time I visit the park. It’s also a great trail to stretch your legs if you’re traveling further up the North Shore for camping and lodging.

High Falls & Two-Step Falls

3 miles, out and back

Explore this trail to check out the tallest falls in Tettegouche State Park. You’ll hike up the eastern side of the Baptism River. Halfway up, you’ll take a staircase down to Two-Step Falls, and then, at the top, you’ll take a second staircase down to the base of High Falls. Try this as a sunrise hike to see the rising sun light up High Falls.

There used to be a bridge crossing over the top of the falls, but spring flooding in 2024 destroyed it. If you have time or are camping at the Baptism River Campground, visit the falls from the western side of the river.

A pit bull standing at the edge of the Baptism River with a view of High Falls in the background

Illgen Falls

0.8 miles, out and back

This 40-foot waterfall is located just off Highway 1. It’s about a half-mile upstream from High Falls. Near the start of your hike, you’ll pass a cabin you can reserve from the state park. This quick and easy hike is a great spot to escape crowds at the more popular locations.

Two-Step Falls via the Baptism River Campground

1.2 miles, out and back

This hike is excellent if you’re camping at the Baptism River Campground. The trail begins at the back of the campground loop. You’ll hike down 200 steps to reach the base of Two-Step Falls. From Two-Step, you can continue up the trail to the top of High Falls. I like to hike this trail with the dogs first thing in the morning when we’re camping here.

Looking up the pine tree-lined Baptism River to Two-Step Falls in Tettegouche State Park

Mount Trudee

6 miles, out and back

If you’re up for it, this challenging trek delivers an outstanding panorama from Mount Trudee. You’ll also get great views at the Red Pine Overlook and Raven Rock. Pick up your trail at the Superior Hiking Trail Trailhead near the Baptism River Campground. Pack plenty of water and snacks along with your other hiking essentials.

Tettegouche Lake

4.8 miles, lollipop loop

You’ll head to the park’s northern end for this underrated trail. The route loops around Tettegouche Lake with views of Lax Lake, Cedar Lake, and Floating Bog Bay. You’re more likely to have this trail to yourself than the ones that start near the visitor center.

Bean and Bear

7 miles, out and back

The Bean and Bear Lake Trail is a popular day hike along the Superior Hiking Trail on Tettegouche’s western side. Your destination is an overlook where the Bean Lake and Bear Lake line up one above the other. This hike will get your heart pumping, so prepare for a challenging day. Plan this adventure in the fall for a kaleidoscope of autumn colors.

Palisade Head

0.9 miles (winter), lollipop loop

This is less of a hike and more of a scenic overlook. You can drive up to the top in the summer. In the winter, you’ll have to hike up a short trail to reach the top. This is a fantastic North Shore photography location and a great spot to watch the sunrise or sunset.

View from Palisade Head, a tall cliff in Tettegouche State Park overlooking Lake Superior

Camping at Tettegouche State Park

This Minnesota state park has over 40 campsites spread throughout its thick forests. There’s sure to be one that suits your needs, whether you like to plug in your RV or prefer the more rustic options.

  • Baptism River Campground – 28 campsites with a mix of drive-in electric ($35/night), drive-in non-electric ($25/night), and walk-in ($25/night) options
  • Lake Superior Cart-In Campground – 13 campsites ($25/night) within 200 feet of the parking lot; use one of the provided carts to haul your gear to your site
  • Backcountry Camping – 5 campsites (first-come, first-served) along the Superior Hiking Trail
  • Cabins – 4 cabins at Tettegouche Camp ($130+/night) and 1 cabin at Illgen Falls ($220/night)

Note: Reserving campsites online also includes a $8 fee. All lodging options are reservable except for the backcountry campsites.

Tips For Reserving the Best Campsites

Check the site details and photos before reserving your campsite. Some sites have steep driveways, or you may have to climb a few steps to reach the picnic table and tent site. I’ve camped in the Baptism River Campground at sites 31E and 28. Site 31E was level with plenty of space around the picnic table area. Site 28 had a steep, paved driveway and an elevated firepit/camping space.

A view of the Baptism River as it flows between tall cliffs to Lake Superior in Tettegouche State Park

What to Pack for Hiking Tettegouche State Park and the North Shore

Check the weather before you head out adventuring and consider the following items:

  • Ten Essentials: Navigation, sun protection, insulation, illumination, first-aid supplies, fire, repair kit, nutrition, hydration, emergency shelter
  • Hiking boots: Lowa’s are my favorite for rough trails and damp conditions
  • Trail running shoes: Altra’s are my go-to for most hikes because they’re comfortable and lightweight
  • Long pants or leggings: Great for cool days and to help keep ticks at bay
  • Shorts: Running shorts are lightweight and dry fast during warm hikes or if you jump in a lake mid-hike (Stio’s Second Light series is my first choice – shorts and jackets)
  • Long-sleeve base layers: Consider a wool fabric for temperature regulation in both warm and cool temps and to protect yourself from the sun
  • Rain jacket: I keep a Stio Ender Rain Jacket in my pack at all times; it’s lightweight and packs up small
  • Bug repellent: Prep your gear beforehand with a permethrin spray and bring a spray or lotion for any exposed skin (Sawyer’s repellents are top-notch)
  • Binoculars: For wildlife watching and birding
  • Day hiking pack: Pick a hiking pack that’s large enough to hold your essentials and a few extra items (camera, binoculars, extra layers, etc.)

Add extra items like a puffy jacket and extra socks for shoulder season hikes and cool or damp days. If you’re heading out on a backpacking trip, don’t forget your tent, sleeping bag, and camp kitchen for a successful adventure.

A woman with a yellow hiking backpack is petting a gray pit bull on a rock outcropping overlooking a forested lake in northern Minnesota

Traveling and hiking with your pup? Check out our favorite gear:

Explore my RockPorch Gear Locker for all of my favorite camping and hiking items:

Explore the North Shore Beyond Tettegouche State Park

Expand your trip with these fantastic destinations along Lake Superior:

  • Gooseberry Falls State Park: Check out even more waterfalls at this popular park
  • Split Rock Lighthouse State Park: Visit one of the most photographed lighthouses in Minnesota
  • Temperance River State Park: Locate Hidden Falls, a waterfall tucked away in a narrow gorge
  • Gunflint Trail: Head up to Grand Marais and dive deeper into northern Minnesota’s backcountry on this scenic drive known for moose sightings and stunning hiking trails
  • Grand Portage State Park: The High Falls on the Pigeon River is the tallest waterfall in Minnesota
A woman and a pit bull are standing on a rock outcropping overlooking a marsh and forest with fall colors

Backpacking with Dogs: What to Pack

Thinking about backpacking with dogs? Whether it’s your first trip or your tenth, consider these items and tips to help you pack for a successful trip with your pups!

10 Items to Pack for a Backpacking Trip with Your Dog

We all have slightly different setups for our backpacking gear essentials, including those we put together for our dogs. Here are ten essentials I consider including when I go backpacking with my dogs.

I may earn a commission or revenue on some items through the links below. This does not affect your price or savings. I appreciate your support!

1. Dog Backpack

Outfitting your dog with a backpack can give them a sense of having a job to do. They can carry their essentials like food, water, and gear. These are two of my favorite dog backpacks that Cool Whip and Hercules actually used:

Tips for Picking the Right Backpack for Your Dog

There is no one best dog backpack; it’s about what works best for your dog.

  • Measure your dog. Don’t rely on weight estimates to select a backpack for your furry friend. Measure the largest part of their chest as you would for a regular harness. A well-fitting and comfortable backpack helps your dog have a more enjoyable backpacking adventure.
  • Check the saddlebag size. Think about the length of your trip. A longer trip requires more food and possibly more gear. Make sure the saddlebags can fit everything your dog might be carrying.
  • Weigh your dog’s backpack. How much can a dog carry in a backpack? Your dog should only carry 10-15% of their body weight. Extra large saddlebags aren’t always that necessary.
  • Start with a day hike. If your pup is new to backpacking, start with a short day hike. Practice hiking in the pack without weight to test the fit. Slowly add weight for a few hikes to build their stamina and strength.
A brown pit bull wearing an orange dog backpack standing on a rocky mountainside

2. Leash, Collar, Harness

Always bring a leash (6 feet or less, not a retractable leash), even if you’re on a hiking trail that doesn’t require your dog to be leashed. You may encounter another dog or other animal along your hike that makes your dog nervous and you’ll want to keep them close. Your dog may also encounter a wild animal it wants to chase, which is not safe for you, your dog, or the other animal(s).

A collar is great to have to carry your dog’s ID tags. It’s also a good backup attachment point for when you need to remove your dog’s backpack or if the backpack malfunctions. 

If your pup isn’t wearing a backpack, a regular dog harness with a handle along the back is a good idea for an outdoor adventure. I love Ruffwear’s Flagline Harness. The handle is useful for helping your dog (especially an older dog) up or down challenging steps and rocky climbs, crossing streams, and more. 

A white pit bull standing on a rocky ledge in front of a river with greenery, rocky cliffs, and sunrise colored clouds in the background

3. Water Bowls and Water

It is always important to carry sufficient water for your dogs and a bowl for them to drink from. Collapsible bowls are my favorite to carry on our outdoor adventures. They’re typically lightweight and collapse down to take up minimal room in your back.

Related Article: Best Dog Bowls for Hiking and Road Trips

A white dog drinking from a red foldable travel dog bowl

4. Dog Food, Food Bowls, Treats, and How to Pack Them

There are a lot of factors to consider when packing dog food for a backpacking trip with dogs. Here are some of the most common questions:

How much dog food should you pack for a backpacking trip with dogs?

Pack enough dog food for the duration of your trip, plus an extra day in case of emergencies. Give your dog larger portions than they get at home since they’re likely expending more energy. 

Also, don’t forget to bring their favorite dog treats for rewards and encouragement.

What type of dog food should you pack when backpacking with your dog?

Dehydrated or freeze-dried dog food is a great choice for packing light. However, you’ll need to ensure you have enough water to rehydrate their food. If you’re backpacking in an area without access to water, you’ll have to carry that water in, which means more weight in your pack. 

Packing dry kibble weighs a little more, but it’s easy to pack and serve. Packing raw dog food can be the most challenging if you need to keep the food cold for multiple meals. Also, it may weigh the most.

Ultimately, this may depend on what your dog eats at home and what they’ll be willing to eat in the backcountry. Hercules used to get nervous in new environments and wouldn’t eat his regular dog kibble for the first meal or two. I would have to bring more enticing food to keep him nourished and energized.

Consider making your first backpacking trip with your dogs a short, easy trip so you can pack extra options to figure out what works (for food and other items). This makes it easier to head home if the trip goes wildly awry.

How should you pack dog food for a backpacking trip?

Packing your dog’s food in a hard-sided container may seem like the most secure option, but it can be challenging to fit into a backpack. 

Some companies offer soft-sided kibble carriers, which are easier to fit in a backpack (yours or your dog’s). The challenge with these can be volume: Will it hold enough food for your dog(s)? When I was backpacking with Cool Whip (70 pounds) and Hercules (65 pounds), I couldn’t find any soft-sided kibble carriers that could hold the quantity of food they needed for more than a day or two.

I typically pack dry kibble for my dog backpacking trips. I put 1-2 servings of dog food in a sandwich-sized resealable plastic bag. Then I put each day’s servings in a quart or gallon resealable plastic bag. 

Two pit bulls in warm jackets and hiking gear looking ahead at the sun peeking around a red sandstone cliff

Do you have to pack dog food in a bear-safe container?

If you need a bear canister for your food, you must include your dog’s food in there as well. Check the bear-safe regulations for the area where you’ll be hiking. Certain national forest, state park, or national park organizations might require bear-safe food storage:

  • Bear-safe canisters
  • Bear boxes at campsites
  • Hard-sided vehicles
  • Hanging food at least 10 feet off the ground and 4 feet away from branches and tree trunks

5. GPS Dog Tracker and Identification

Make sure your dogs are wearing ID tags with your contact information. Also, consider investing in a dog GPS tracker. Most GPS dog trackers require a subscription, so it’s a good idea to set this up well before your hiking trip to ensure it’s active and you know how to use the app to locate your dog.

My two favorite dog GPS trackers for Cool Whip, Hercules, Lulu, and my parent’s dog Phyllis are from Tractive and Whistle (both purchased in Spring 2022). The original Whistle device I use (Go Explore) is no longer available, but there is a 2.0 version (I do not know if it works as well or better). I also tried the Fi tracker, but it didn’t work well in my area (limited cell reception).

A white pit bull wearing an orange bandana and a rainbow colored GPS tracker standing in a grassy meadow among trees

6. First Aid Kit for Dogs and Carry-Out Harness

A lot of the items in your regular first aid kit can be useful for your furry friend, but there are a few additional items you’ll want to consider adding. Check with your vet to review what is safe for your dog and when/how to use each item. 

  • Safety carry-out harness – Carry out your dog if they’re unable to walk
  • Rubber dog boots – Keep an injured paw clean and dry
  • Self-adhering bandage – Wrap up a wound without tape that sticks to fur
  • Antibiotic spray/ointment – Healing aid and protection
  • Digital thermometer – Easy to read
  • Muzzle – For your safety and theirs
  • Slip lead – A backup leash that doesn’t require a collar
  • Benadryl – For allergies
  • Irrigation syringe – Helpful in giving oral medication or flushing wounds
  • Milk of magnesia / activated charcoal – Absorb and counteract poisons
  • Hydrogen peroxide – Antiseptic
  • Non-medicated saline rinse – Flush wounds and eyes
  • Styptic powder – Stop bleeding from a torn nail
  • Magnifying glass – Easier to see splinters/wounds
  • Needle-nose pliers/multi-tool – Remove thorns, etc.
  • Tick removal tool
  • Disposable gloves
  • Flashlight
  • Pet first aid book

7. Poop Bags

Good trail etiquette for any dog owner is to pick up after their pet. Carry enough poop bags to clean up the dog poop your pup leaves along the hiking trail. The easiest way to get dogs banned from a dog friendly trail is to leave dog poop on the trail for other hikers to encounter.

8. Weather Protection When Backpacking with Dogs

Check the weather before your hike and pack accordingly for your canine companion: rain jacket, dog fleece coat, insulated dog jacket, dog booties, etc. At minimum, I include our Tooth and Honey fleece jackets (lightweight but warm) for the dogs. Even on a warm day, we can all get chilled as the temperature drops in the evening.

Two pit bulls in blue fleece sweaters looking out a field of large stone pillars while camping at City of Rocks State Park NM

9. Sleeping Gear for Dogs Backpacking

Where will your dog sleep at night? If you have a medium or small dog, they might sleep in your sleeping bag. For Cool Whip and Hercules, I would bring my Klymit inflatable sleeping pad and a fleece blanket for them to sleep on (the blanket kept the pups cozy and protected the pad from their nails). Another option might be to bring a lightweight dog bed or foam sleeping pad (cut in half if they don’t need the full length).

A white pit bull sleeping on a green sleeping pad in a tent

10. Backpacking Tents

I did most of my backpacking with two large dogs, so I needed a tent that accommodated more than one person. I opted for a two-person backpacking tent. Backpacking tents can be slightly smaller than the average tent, so a three-person backpacking tent might be worth considering as well. The extra space was worth a bit of extra weight. When car camping, a regular two-person tent fit us just fine.

Additional Considerations When Backpacking with Your Dog

Protect Your Tent Floor

When camping in soft or sandy areas, there is a chance your dog’s nails will puncture the tent floor (speaking from experience). Before I let the dogs in the tent, I spread out a blanket or put down the sleeping pads and sleeping bags right away.

Add tent tape to your emergency pack. Seal holes when you find them to prevent additional ripping or leaks.

Protect Your Dog’s Paws

Dog boots are a great way to protect your dog’s paws. Not all pups are used to walking on rough terrain or for a long distance. I also keep a set of rubber booties in the first aid kit. They’ll keep paws clean and dry in the event of a cut paw or abrasion.

What other dog gear do you include in your pack when backpacking with dogs?

Camping with Dogs at White Sands National Park

Camping with dogs at White Sands National Park is super rad. You’ll get sand everywhere. For all of eternity. It’s worth it. Just go.

Two dogs flank a human sitting on a white sand dune with a purple sunset and mountain in the background while camping with dogs at White Sands National Park

Visiting and Camping with Dogs at White Sands National Park

I may earn commission or revenue on some items through the links below. This does not affect your price or savings. I appreciate your support!

January 25, 2024 Update – Per the White Sands National Park website: Backcountry camping is currently closed due to rehabilitation of camping sites. No date has been determined for its reopening.

Our trip started with a speeding ticket out in the middle of seemingly nowhere when I was legit trying to follow the speed limit. Somehow, I missed a sign. Herc was NOT pleased with the cop approaching my window. All sorts of ferocious woofs and growls coming from the peanut gallery: “Who the heck do you think you are trying to give things to my mom?! Did I say you could approach the vehicle?? Scram! Skedaddle!”

Beyond that minor incident and the fact the Cool Whip was appalled that she had to carry a pack, we had an incredible adventure. White Sands National Park is a beautiful dog friendly area to explore.

White Sands National Park is just outside Alamogordo and the Holloman Air Force Base. It is about six hours from Phoenix. I considered adding the Organ Mountains to our trip, but I opted for City of Rocks State Park. But whether you add more pit stops or not, this unique desert spot is worth the trip.

The dunes are made of white gypsum, a fair bit different from the classic brown sand of Great Sand Dunes National Park. Sunrise and sunset are excellent times to see the dunes as they take on the colors of the sky.

Activities at White Sands include the following and more:

  • Hiking. Dune Life Nature Trail, Playa Trail, Interdune Boardwalk, Alkali Flat Trail, Backcountry Camping Trail
  • Sand Sledding. Bring your plastic snow saucer or purchase one at the visitor center
  • Picnicking. There are shaded tables and grills with nearby restrooms in the parking areas
  • Backcountry Camping. There are no drive-up sites or RV camping options, but you can still spend a night in a tent
Two dogs flank a human sitting on a white sand dune with a sunset and mountain in the background while camping with dogs at White Sands National Park

​Check the Weather and the Missile Launches

Visiting White Sands in February treated us to minimal people and great weather. But, like planning a backpacking trip at Petrified Forest National Park, you’ll want to keep an eye on wind speed and temperature. There will almost always be wind. 10-15 mph is average, but use caution when rates hit 25 mph or greater.

The temperature at White Sands can also get a little extreme. Summer temps average 95 during the day and 55 at night. Winter cools down to 60 as a high and lows down to 23.

And yes, be sure to check for any planned missile range testing. White Sands Missile Range surrounds White Sands National Park. Missile range tests occur about twice a week. The monument and part of highway US 70 may be closed for an hour or two during this time.

A white dog in a blue sweater; the dog has one ear lifted in the wind

​Reservations, Permits, and Cost for Camping with Dogs at White Sands

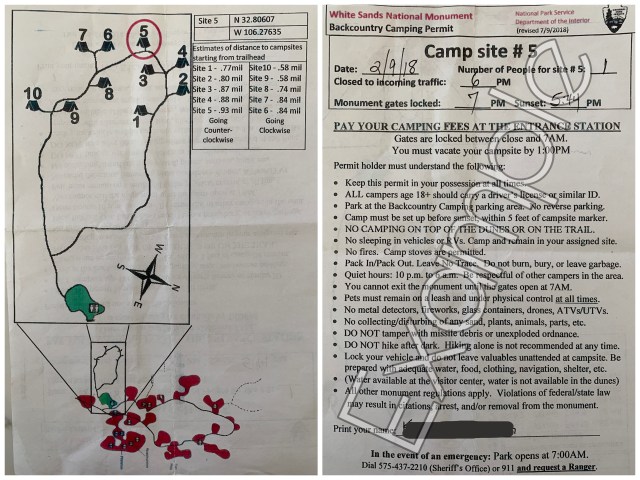
Camping at White Sands requires a permit. You cannot make a reservation or acquire a permit for a White Sands backcountry campsite until the morning of your overnight adventure. Verify hours of operation before you plan to arrive. Stop at the entrance fee station to obtain your permit.

Rangers assign the ten available camping spots on a first-come-first-served basis. Camping fees are $3.00 per person aged 16+ and $1.50 for those 15 and younger. You’ll pay this fee AND the general entrance fee of $25.00 per vehicle (waived if you have the national park pass) at the entrance station.

You must leave your site by 1:00 pm the next day, and you must request a new permit in person if you wish to stay another night.

A paper showing a map of the backcountry trail and campsite at White Sands National Park and another paper that serves as a permit for backcountry camping with dogs at White Sands National Park

​Poop: Your Dog and YOU

Yes, you have to scoop ALL the poop. Always practice the Leave No Trace principles. Check with a park ranger at the Visitor Center for a Wag Bag if you didn’t bring a waste disposal container. Or, as one crafty ranger recommended to me, you can use the bags they provide at the pet waste stations around the park (one of which happens to be located right in front of the visitor center). These pet waste bags are pretty large and sturdy, by poop bag standards, not skimpy ones that tear if you pick up more than one poop nugget.

Shop: These are the Earth Rated dog poop bags I use.

A pet waste station with a sign on the garbage can noting a graphic of a snake and the word "Rattlesnakes"

The Backcountry Camping Trail

You checked the weather, acquired a permit, loaded up on poop bags, took one last potty break at the toilets by the trailhead parking lot, and now you’re ready to head out on your adventure—woohoo!

The backcountry camping trail is a 2-mile lollipop loop that goes up, over, down, and around many dunes. With the ever-changing nature of the dunes, there is no regular trail on the ground you’ll follow. Instead, you follow orange trail markers staked into the dunes.

Once you reach your first marker on the trail, do not continue moving forward until you see the next marker. Continue this way for the remainder of the backcountry trail. Remember, you’re in a giant sandbox with no other landmarks to guide you, so it’s easy to become disoriented and lose track of your direction. Additionally, GPS tracks have a hard time displaying accurate readings out here. So, always stay aware of where the next trail or campsite maker is staked.

A White dog standing next to an orange stake sticking into a white sand dune; the stake has graphics depicting the rules and marking the route for the backcountry trail at White Sands National Park
A brown dog with an orange backpack standing next to a wooden trail marker stuck into the white sand dune

Campsites at White Sands

​You’ll eventually see the campsites noted on the trail markers as you’re cruising along the trail. Each campsite is in an open valley among the dunes. Once you find your campsite number on a trail marker, look for another marker at the base of the dunes. This is where you’ll set up camp, keeping your tent within five feet of that stake on the valley floor.

An orange trail marker stake and a wooden trail marker stuck into a white sand dune; between the trail markers you can see a green tent in valley down below; this is a campsite when camping with dogs at White Sands National Park
View of white sand dunes under a cloudy sky, tucked into a valley in the dunes is a barely visible green tent; a great site for camping with dogs at White Sands National Park

Camping With Dogs at White Sands National Park

ALWAYS keep your dog leashed while visiting White Sand National Park, even at the backcountry site. There are plenty of lizards and other animals around that you don’t want your dog to disturb. Additionally, you need to be able to find their poop to pack it out.

What to bring when camping with dogs at White Sands:

  • Water. There is NO water out in the dunes. Not even a stream. Make sure you bring plenty for yourself and your dog. Even if the temperature is cool, hiking across the dunes takes some effort.
  • Water bowl. Cool Whip and Hercules can drink out of my hydration pack spout, but a bowl is a lot easier. Here are some of the travel dog bowls we’ve used for hiking and backpacking.
  • Poop bags. Yes, I’m mentioning them again. Don’t be THAT person leaving poop around for others to stumble upon. Don’t bury it either. With all the wind blowing things around, it will resurface in no time.
  • Warm gear. The wind can cool you down a lot during the day, and it gets quite a bit cooler at night. Make sure your pup is comfortable. Bring a warm coat and a blanket or sleeping bag for your dog to snuggle into at night. Other than during our hike out to the campsite (mid-afternoon in February), Cool Whip and Hercules wore their fleece jackets the entire time.
  • Dog backpacks. These aren’t totally necessary, but they are helpful. Cool Whip and Hercules carried their own food and fleece sweaters. Herc is wearing the Ruffwear Approach Dog Backpack.

Now get on out there and have some fun!

Looking down at two dogs, a white pit bull with a black backpack and a red stripped scarf, and brown pit bull with an orange backpack and teal striped scarf; the dogs are on leashed and standing on white sand

Hiking Pawnee Buttes National Grassland

A little way off the beaten path, down quite a few miles of dirt roads, this national grassland is the perfect place for a pit stop and a hike. Here’s what you need to know about hiking Pawnee Buttes National Grassland.

Two dogs in sweaters standing in a grassy field with a pink, purple, and blue sunset in the background

Pawnee National Grassland is in Weld County, northeastern Colorado, about 35 miles east of Fort Collins. Eastern Colorado is quite unlike the rocky, mountain views most expect from this state. In the eastern plains, you’ll experience low, rolling hills and expansive views of flowing grass, cattle, oil rigs, and wind turbines. The Fence Post has an excellent overview of the area’s history.

We stop here on almost every road trip between Arizona and Minnesota. While national parks aren’t always the most dog-friendly places to visit (but Petrified Forest and White Sands are our favorites!), national forests and national grasslands are some of the BEST places to go with your pup!

Getting to the Pawnee Buttes Trailhead

​From either direction, you’ll turn from a dirt county road onto more of a two-track dirt road. A few signs are pointing the way there. But I usually rely on Google Maps to guide me to the trailhead. I got decent cell service through most of the grassland unless I was tucked into a dip between the prairie hills.

A white dog standing on a hill overlooking the trailhead for Pawnee Buttes with grassy fields and buttes in the background

Hiking Pawnee Buttes Trail

Pawnee Buttes Trailhead has several covered picnic tables, grills, toilets, and informational signs. The trail is about 4.5 miles round trip and relatively easy for most hikers.
​
Dogs are allowed on the trail but must be on a leash or under voice control at all times. There are free-range cattle in the area, along with plenty of wildlife: coyote, prairie dog, swift fox, mule deer, burrowing owl, pronghorn, rattlesnakes, and more.

The Pawnee Buttes Trailhead informational sign

​​From the trailhead parking lot, you’ll pass through a gate to begin the trail. After that, you’ll come to a short trail forking off to the right for a lovely view of Lips Bluff. Continuing on the main trail, you’ll cross in front of Lips Bluff. Eventually, you’ll drop down between Lips Bluff and Overlook escarpment. Here you’ll notice a slight change in this semi-arid landscape, with more trees and bushes sprouting up along the washes.

A woman and two dogs hiking Pawnee Buttes National Grassland trail in a grassy field with buttes in the background
A brown dog overlooking a grassy field and buttes in Pawnee Buttes National Grassland
Hiking Pawnee Buttes National Grassland

Along the backside, after your hike up out of the washes, you can hike up onto Lips Bluff. A seasonal closure of Lips Bluff and the Overlook from March 1 to June 30 protects birds nesting in the area. Many visitors come to the buttes for birdwatching (prairie falcon, redtail hawk, golden eagle, lark bunting, and more). Even if that area is closed, you can continue on the main Pawnee Buttes Trail to West Pawnee Butte and East Pawnee Butte.

​The second butte, East Pawnee Butte, is on private land. Be sure to leave any gates you pass through as you found them. Additionally, do not climb on the west butte, east butte, or other surrounding mesas. The ground erodes easily, causing damage to the landscape and danger to hikers.

A grassy field with buttes in the background and a wooden sign stating "The area behind this sign is closed March 1 - June 30 to prevent disturbance of wildlife
Two dogs on a hiking trail in a grassy field with buttes in the background

Camping at Pawnee National Grassland

Throughout the Pawnee National Grassland, there are options for dispersed camping or staying in a designated campground. Most of the dispersed camping is along the dirt road to Pawnee Buttes Trailhead. If you’re selecting a camping spot along this road, be sure to stay only in a previously used site. For a designated campground, consider the Crow Valley Campground along the eastern section of the grassland and closer to Briggsdale and Greeley, Colorado.

View of a grassy field and buttes under a blue sky at sunrise

Check the Weather and Be Prepared When Hiking Pawnee Buttes National Grassland

We’ve camped in the Pawnee Grassland multiple times, and each time there were strong winds and usually a storm right before or during our stay. The county road is typically passable, but the dirt road leading to the trailhead is a bumpy washboard on a good day. After a strong storm, there are large standing puddles, mud, and some severe washouts. Know your vehicle’s capabilities and what to do during a lightning storm.

Additionally, the weather can get quite warm. Be sure to bring plenty of water along during your hike. Check out these dog bowls for hiking if you need one for your pup!

View of brown dog in a teal sweater in a grass field with buttes and a sunrise sky in the background

Backpacking to Island Lake & Titcomb Basin

Pole Creek Trail started as an easy but steady climb. Climb being a bit of an aggressive term as it was a wide, well-worn path. It felt like we were on a casual stroll through a wooded park, going uphill ever so slightly. Not what I expected as our start to backpacking to Island Lake.

A lake surrounded by mountains covered in clouds, pine trees, and flowers, a regular view when backpacking to Island Lake

I may earn commission or revenue on some items through the links below. This does not affect your price or savings. I appreciate your support!

I journeyed back to our backpacking trip in Banff the year prior, where the trail was most decisive in its choice to start with some solid elevation gain. No meandering casualness about it. A precursor to the trail and days to come.

Regardless of the start, Banff was epic, and I had no doubt our adventure to Titcomb Basin in the Wind River Range would be as well.

A group of people sitting around a campfire at a campsite surrounded by tall pine trees

The Start of Backpacking to Island Lake

We had arrived at Trails End Campground Sunday afternoon to snag a good campsite so we’d have minimal travel Monday morning to start our hike. Campsites were first come, first served. But we need not have worried as it seemed like no one else was around, despite two marginally full parking lots.

Each of the 8 sites housed a fire ring, picnic table, and bear locker. The pits toilets were well-maintained, and there was a water spigot at the Elkhart Park – Pole Creek Trailhead (right next to the campground). Unfortunately for us, the spigot was not working at the time of our adventure, but in theory, it would be a convenient feature.
​
Throughout the evening and into the night, more adventure seekers wandered in. I was glad we’d nabbed a spot early; the campground was full when we rose Monday morning.

While backpacking to Island Lake, a backpacker stands on a rocky overlook facing mountains in the distance

Day 1 Hobbs Lake

Our rough goal for the first day of backpacking to Island Lake was to reach Hobbs Lake at roughly 7.5 miles. Up in Banff, we realized we preferred the days with moderate hiking. This allowed more time for relaxed exploring (i.e., enjoying time without packs on our backs). This adventure to Titcomb Basin wasn’t meant to be a suffer-fest.

It seemed as though we saw just as many horse prints (and poo!) on the way up as we saw human tracks. From the trailhead to Hobbs, it seemed like we saw more people than we did during our entire trip in Banff. A fair bit of that traffic included day hikers heading to Photographers Point, 4.5 miles up the Pole Creek Trail. We stopped here for lunch because, as the name implies, it is a great spot to take in the view.
​
While the foot traffic died down after that point, we did stop to chat with one pair trekking homeward. They recommended we stop at Eklund Lake for our final night. This would put us just 5 miles from the car, which would make for an effortless last day. We tucked that tidbit away for later in the week.

A hiker sitting in a camp chair looking out at a lake surrounded by pine trees and mountains

At Eklund Lake, we took the Seneca Lake Trail to continue our route. You can continue on Pole Creek to hit the Highline Trail as an alternate route to Titcomb Basin, but that was more mileage than we wanted for this trip.
​
Upon reaching Hobbs around 3 pm, we found a great set of campsites. Four of them were clustered together—perfect for our crew. It made it easy to stay the night here versus continuing to Seneca Lake or Little Seneca Lake. We were halfway to Titcomb Basin. Shortly after we set up camp, the clouds started sputtering raindrops, a perfectly timed cue to enjoy a nap before dinner. Everyone dispersed and zipped into their tents just as the clouds really let loose.

It poured. A heavy, drowning rain perfectly enhanced by swift blasts of wind. This had not been in my forecast for the week. Not until possibly our last day or two. But, as we all learned later, the Winds have their own weather routine once you wander far enough into their domain.
​
One should generally assume there will be an afternoon storm every day around 3 pm, give or take a bit, depending on the mood of the skies. We survived with just minor leakage in one tent and a renewed respect for the epic power this landscape held.

​Dinner was devoured under blue skies.

Four hikers making dinner at a lake surrounded by pine trees and mountains

Day 2 Backpacking to Island Lake

Overnight rain left us with damp rainflies the next morning. But we only had about five miles to cover. So there’d be time for them to dry out at Island Lake. Even with the afternoon storms.

Trekking up to Seneca Lake and then to Island Lake brought more elevation than the previous day. This is what we’d been expecting; I was happy to labor up. The views were outstanding, especially following the trail along a granite cliff overlooking Seneca Lake.

However, my favorite portion of the trail was between Little Seneca Lake and Island Lake. It was nice to head out of the woods and see more wide-open views. Plus: Wildflowers!
​
And then we crested our final ridge until our hike into Titcomb Basin and caught our first glimpse of Island Lake—what a stunner!

A lake surrounded by mountains covered in clouds, pine trees, and flowers, a regular view when backpacking to Island Lake

We rambled down the valley dotted with pine trees and boulders until we happened upon a good campsite where two men looked to be just finishing their packing. They highly recommended the spot, and we enjoyed a lively chat until they headed out. The best part was learning that they’d been friends for 38 years! Goals!

We set up just in time for the afternoon rain (much less tumultuous than the previous day). Then we spent the rest of the day exploring the valley and Island Lake.

Day 3 Hiking Titcomb Basin

Day three held our only day hike. The actual hike into Titcomb Basin. It felt luxurious to have a base camp and leave the tents in the same spot for more than one night. We enjoyed a lazy morning. Then we set out for Titcomb Basin around 10 am, packing lunch and rain jackets, just in case. The morning had been chilly. But the sun came out and the hike warmed us up. Soon it was t-shirts and tank tops.

A lake surrounded by mountains covered in clouds and flowers

Titcomb Basin was quite rad between the lakes and the peaks that tower behind and around them. There were very few people hiking up there even though tents and backpackers heavily speckled the Island Lake valley. It was like we had Titcomb Basin to ourselves.

That was until we ran into several gentlemen at the base of the last lake. They were coming down from the peaks and had all sorts of crazy stories about the weather and conditions. Unfortunately, the start of the afternoon rains cut our socializing short. So, we pulled out the rain gear and hiked our way back.

The rains cleared by the time we returned to Island Lake. So we spent the remainder of the day exploring the waterfall that emptied into the lake. This made the trip to Titcomb Basin 100% worth everything for me. Even considering the thunder, lightning, sleet, and snow that filled our evening later.

Day 4 Hiking Home

In the morning, we shook off the snow. We packed up with frozen fingers and feet and hustled up out of the valley. We were tired and damp when we stopped for lunch. However, we decided to power through the remainder of the miles (12.1 total) to Elkhart Park Trailhead to get hotels and hot showers that evening. We also stopped at Wind River Brewing in Pinedale, WY, for a celebratory burger and beer, which I’d highly recommend.

Five hikers backpacking to Island Lake taking a break on rocks by lake surrounded by mountains covered in clouds, pine trees, and flowers
Five hikers hanging out on the rocks along a waterfall

Backpacking Banff National Park

Make backpacking Banff National Park your new goal. Just trust me, it’s a good goal.

The dogs and I catapulted into camping and hiking with a trip to Banff National Park, Canada. I was instantly obsessed and knew I couldn’t stay away.

Five backpackers sitting on a log bench facing a lake reflecting the pine tree lined shore and mountains in the background

I may earn a commission or revenue on some items through the links below. This does not affect your price or savings. I appreciate your support!

I prefer the company of my dogs over humans. However, dogs are not encouraged to accompany backpackers into the Banff backcountry. But my desire to explore more of Banff still prompted me to plan a group backpacking trip.

I started reading about this hike and that hike and those other hikes. There are so many options. ​And yet, I kept coming back to Egypt Lake. I felt like I had to include that area in our wanderings.

Backpacking to Egypt Lake, Banff National Park

After reviewing a few route variations, I went with a point-to-point option from Sunshine Village to the Vista Lake Trailhead:

  • Park Car A at Vista Lake Trailhead.
  • Drive Car B and the crew to Sunshine Village.
  • Hike up Healy Pass to Egypt Lake Campground (E13) for Night 1.
  • Take Whistling Pass to Shadow Lake Campground (Re14) for Night 2.
  • Hike Gibson Pass to Twin Lakes Campground (Tw7) for Night 3.
  • Trek out to Car A the following day and pick up Car B.
A sparkling teal lake surrounded by pines with mountains in the background

Backcountry Camping Permits and Campsites for Backpacking Banff National Park

Backcountry permits and campsite reservations are mandatory for overnights in the Banff National Park backcountry. Advanced reservations are a must.

A backcountry site in Banff has enough room for one 3- or 4-person backpacking tent. I don’t know the exact dimensions, but one site can perfectly fit a 2-person Big Agnes backpacking tent and a 1-person Big Agnes backpacking tent.

Two backpacks set by a backcountry tent site, which is a square outlined with four logs, among a pine tree landscape

At the end of June, I called the listed number. I left a message with our requested sites, dates, and the number of people. Then, they called back to confirm details and collect the fees within a day. Easy-peasy!

Packing and Prep for Backpacking Banff National Park

​My spare bedroom soon became a disaster zone as I laid out gear to assess options and gaps. No matter how much gear I have, I always seem to need (want) something new for each trip. Anyone else like that?

I made a list and checked it twice. I went online to order a few items and got sucked into the black hole that is the internet. Aside from purchasing more than I needed, I saw that the Verdant Creek Wildfire had spread. It had caused restrictions and closures in the Egypt Lake area. Eek!

A lake with a rocky shore surrounded by pines and mountains

The weekend before our trip, I called the backcountry reservation office Saturday morning to alter our plans. Of course, they called back while I was in the shower. I left another message that afternoon and waited for the callback Sunday morning.

Then Sunday morning arrived, and suddenly Egypt Lake was back open! Ten minutes after I saw the announcement, Banff Backcountry Reservations called me back. They confirmed we were safe to proceed with our plans. Whew!

Healy Pass: Sunshine Village to Egypt Lake

We rolled up to Sunshine Village, and I was filled with antsy enthusiasm. The type that makes you continually feel like you’re about to pee your pants. Even after you just peed twice to make sure you really didn’t have to pee. Am I nervous? Am I excited? Do I really just need to pee??

Pine trees in the foreground framing a view of mountains and lake in Banff National Park

​All of the other hikers pulling up seemed to be taking the shuttle bus up to the top of the gondola. I started to second-guess our plans to begin our hike directly from the parking lot.

Two of us wandered up to the ticket desk for a local opinion of our plans.

Them: “We highly recommend taking the shuttle up.”

I felt like I had to pee again.

​Us: “Okay, we’ll hike up.”

Of course, we chose to start our hike directly from the parking lot. Because that’s the type of group we were becoming. Go big or go home. And none of us had decided to stay home.

A backpacker standing along a rocky river in a pine forest

Healy Pass, Banff National Park

The hike was challenging for us, not going to lie. Not difficult like it was tricky footing or scrambling across rockslides. But some folks were new to backpacking, and some were new to the elevation (not even counting the elevation we were gaining during the hike). We started later than planned, and no matter how close we seemed to be getting to the top, it always seemed to be just over the next crest, just out of reach. It felt like a long day.

Backpackers in the distance along a meadow trail with pine tress and mountains in the background

We were beat by the time we rolled into the Egypt Lake Campground.
But we had made it.

We roamed through the campsites looking for three positioned near each other for our little caravan and dropped our packs as fast as we could shake them off.

As we sat by the river, refilling our hydration packs before dinner, we finally had a chance to sit back to take it all in — the calm but epic beauty surrounding us.

Worth it.

A calm river cutting through bushes and pine trees

After a quick pack-up of campsites, we meandered along the short hike to Egypt Lake for breakfast with a view. The water was pristinely calm, showcasing a flawless reflection of the mountains surrounding the lake. And what glorious mountains they were! The peace and calm offered a meditation of sorts, a chance to shake off the prior day and start anew.

A lake perfectly mirroring the background view of mountains and pine trees

Whistling Pass: Egypt Lake to Shadow Lake

It was going to be a 10-mile day. After leaving Egypt Lake, the trail almost immediately started going uphill. The ascent of Day 2 was more of a stair climb compared to the gradual ramp-up of Day 1. I was partial to the stairs, the definite motion of going up. It gave me a straightforward sense of accomplishment.

Creeping down the rockpile, however, felt like an eternity! Testing the larger rocks for stability and trying not to slide on smaller crumbles and sand, it was a slow and steady journey to the base. After focusing so intently on my small steps down, I didn’t take in the magnitude of this rockpile. Not until I reached the base and turned around. Eyes went wide; mouths opened in awe. This is what I was out here to see.

A hiking trail going through a mountain pass near the tree line and a backpacker to the right looking small among the landscape

Leaving the rocks, the trail took us back down into the trees toward Haiduk Lake. Two-thirds of the way in, we saw our first sign of bears: several piles of bear scat along the trail. I tried to reassure myself by noting that none of the piles was ultra fresh, but I still caught myself looking behind me more than I care to admit.

Three backpackers hiking through pine tress with mountains in the background

Haiduk Lake, Banff National Park

Bears were instantly forgotten the moment the view opened up to the glacial waterfalls filling Haiduk.

What.
A.
​Stunner. ​

In the distance is a waterfall cascading over a rocky ledge with mountains all around

In our awe-induced stupor, we lost track of the trail and opted to follow the lakeshore until we were back on track. Two steps into the chest-high brush was the exact moment we remembered the bear scat. Singing and overly vocalized chatter immediately commenced.

As we tumbled out onto the trail our singing abruptly ended at the sight of seemingly fresh bear tracks in the mud. Excitement. Awe. Wariness.

“Wow, fresh tracks!” “Whoa, look at the size of that print!” “It may be heading away from us, but we should probably still skedaddle on out of here…”

From Haiduk, the trail took us into a mossy floored pine forest and eventually followed along the river leading to Shadow Lake. Along the way, we passed the Ball Pass Junction Campsite, which was still closed due to the fires. It had a bit of an eerie feel to it, and whether that was due to the knowledge of it being closed or because it was out in the middle of nowhere, I’m not sure. I just know I was quite pleased to leave it behind us, and I made a mental note to skip that site if I return to this trail again.

A wooden bridge for a trail crossing through a marsh with pine trees and mountain in the background

Shadow Lake Campground, Banff National Park

Shadow Lake almost felt like a false summit to me. Only in that I was exhausted, hungry, and ready to ditch my pack for the evening. As much as I wanted to sit on the bridge admiring the view for more than a short break, I was definitely antsy to reach camp. One more mile to go…

A lake and mountains with some glaciers in the background, a common view when backpacking Banff National Park

By the time we arrived at the Shadow Lake campsites, I was hungry and tired. Add in lacking signage for tent sites and bear hangs (which we later realized was due to the direction we arrived from) and water that required boiling for consumption, I was grumpy as heck.

Thankfully for my adventure companions, I just needed a little food to calm me down. But that didn’t solve our minor annoyance of having to boil water. There is no easy access to the lake or streams from the campsites. The spigot available for backpackers has a sign indicating that you must boil the water before consumption. Rough lives we lead out in the woods (insert overly exaggerated eye roll).

​The guys went exploring around the Shadow Lake cabins nearby. We couldn’t imagine they boiled all of the water needed for guests. There had to be another way to access drinking water. Luckily, a friendly employee clued the guys in on a drinking water spigot along the side of one of the cabins. A nice bonus to help us set out on the right foot in the morning. ​

This was a nice campground, but my least favorite of our trip backpacking Banff National Park.

Gibson Pass: Shadow Lake to Lower Twin Lake

We set out as a group on Day 3, climbing up and out of the woods. A solid hike pleasantly rewarded by stunning views (as if there is any other sort of view out there). At 7,500 feet, we reached Gibson Pass.

A hiking trail leaning up to a mountain in the background, Gibson Pass,

Three groups hiking up (two on foot and one on horseback) dotted the downward trek from Gibson Pass. We connected with the horse crew right as we came upon a large fallen tree blocking the path. It would have been quite tricky but doable for us to shimmy over. On the other hand, the horses seemed stuck. That is, until one of the men hopped off his horse and appeared at the tree with a saw. Ha! Perfectly prepared!

Another highlight from the passing groups was receiving a suggestion for stopping at Upper Twin Lake. “Right before you cross the bridge, take a small path to the left along the shoreline. You’ll wind up in a perfect location for lunch.”

Looking out at two hiking poles in front of a aqua-colored lake with a background of a pine covered mountain, a glacier, and a taller rocky mountain, a common view when backpacking Banff National Park

And perfect it was. We settled in for a couple of hours of relaxation. Sam decided he would finish his hike out to the road that afternoon. He’d gotten a somewhat severe cut on his hand, and he was ready for a real shower. Understandable. We said our goodbyes, and then we set out for camp shortly after.

Lower Twin Lake Campground, Banff National Park

As it turned out, Lower Twin Lake was equally as perfect as Upper. It had just one slight advantage: it was our campsite for our final night!

TW7 was easily THE best camp of our trip backpacking Banff National Park. Tent sites set back in the trees. A dining area snuggled up to the shoreline. And this view. Oh, what a place of wonder!

We soaked up every last ounce of sun and wild we could experience.

A man sitting on a boulder in the shallows of a lake with pine trees and mountains in the background, a perfect spot while backpacking Banff National Park
A grassy marsh leading out to pine tress and a pink-tinged mountain at sunrise, a common view when backpacking Banff National Park

Lower Twin Lake to Vista Lake Trailhead

Our last day was the easiest. Just a handful of miles to hike from Lower Twin Lake Campground up to Vista Lake Trailhead. We encountered a fair number of day hikers along the way. As well as more fantastic views. There will never be a shortage of great views when backpacking Banff National Park.

Once we reached the car and picked up the other car, we headed into town. Banff is a cute, mountain tourist town with a lot of shops and restaurants. We grabbed lunch and a beer and then started our trek home.

Golden leafed trees in front of a sparkling lake with pines on the mountainside behind, a common view when backpacking Banff National Park

Related Post: Backpack to Island Lake and Titcomb Basin, Wyoming, US

Backpacking to Whipple Valley

Utah is amazing, there’s no getting around that. And while there are several lovely national parks in the state, I’ve found that national parks only seem to have one or two relatively short trails that dogs are allowed to hike. National forests, on the other hand, are prime-time adventure-dog real estate. Backpacking to Whipple Valley would be perfect.

A woman with two dogs walking along a stream in a mountain meadow

Trail Details for Backpacking to Whipple Valley

For this trip, my eyes were on Dixie National Forest in the southeast corner of the state – Whipple Trail in the Pine Valley Mountain Wilderness, to be exact.

Trail length: 12 miles (O/B)
Elevation gain: 2,890 feet

Looking down at a white dog with a blue backpack and a brown dog with a green backpack
Looking out at a green valley below pine covered mountains

Planning

There is something to be said for planning far enough ahead. We’ll just get that statement out of the way right now.

A week before we rolled out is when I decided we’d be rolling out. The plan was to leave work early on Friday to drive the 7 hours to the Pine Valley Recreation Area. This is where you’ll find the Whipple Trailhead. We’d camp at a designated campsite. Then start hiking right away Saturday morning and sleep in Whipple Valley. Sunday afternoon, we’d hike down to spend the night at the campsite again. And then head home early Monday morning.

Not a bad plan for a regular weekend. But a horrible plan for Memorial Day weekend when everyone and their uncle’s cat decides to go camping and you’re trying to stay at a first-come-first-served campsite and work gets busy, so you can’t leave until Saturday morning.

Spoiler alert: We still had a grand adventure!

A mountain stream cutting through the woods

Hiking up to Whipple Valley

We arrived in Pine Valley around 2:30pm. As expected, no campsites were available. Luckily you can park for free at the trailheads if you’re just hiking for the day or doing overnights on the trails.

A three-person family was gearing up as I pulled into a parking spot. We compared notes on what we knew about the trail: Rangers had yet to clear it. Downed trees across the trail. Potential snow at higher elevation on north-facing areas.

The weather was warm, and the elevation hit me a little harder than expected. But it was a beautiful hike with spectacular views and just enough shade to even out the warmth. The hounds were on their best behavior – or maybe the elevation was hitting them a bit as well.

There was no water on the trail until we hit a few streams halfway up. Here we ran into our second human encounter. A couple was setting up camp. They reported that they’d only gone halfway up the remainder of the trail before turning back because it was more challenging than the first portion. Super!

A grassy mountain meadow with snow among the trees along the edges, a view you may encounter when backpacking to Whipple Valley
A white dog and a brown dog looking out at sunset in a mountain meadow, a nice reward after backpacking to Whipple Valley

I kept on trekking, taking breaks often, thinking about how easy it would be to turn back or just set up camp at any of the other sites we came upon after that point. We reach the first pocket of snow tucked up under some pines. Then a patch, closer to the trail. Another blob covering half the trail. Just as we came upon the next set of campers, snow-covered the remainder of the trail as it headed from the summit area of the trail down to where the trail spilled out into the valley.

We hopped and slid down to the green space ahead. I stared in awe as we stepped from the trees into the grassy valley that opened up ahead. Green grass, tiny spring flowers, a stream down the center. There was still snow tucked away in the shadows of the tree line, rumpled up dirt where the snowpack had moved along, and water simply flowing out of the ground from the thawing process.

We located a narrow portion of the stream to cross and set up camp across the way. I could see two other campsites when we explored a bit more. The the family of three arrive a short time later. We wound down with a beautiful sunset and retired for the evening.

A white dog with a pink collar looking out at snow under the trees along the mountain meadow, a common sight when backpacking to Whipple Valley
A woman sitting on a blanket on a rock with two down in a mountain meadow, a great way to relax after backpacking to Whipple Valley

Backpacking during the Shoulder Season

The houndy hounds were a bit chilly at night (it dropped below 40) because someone forgot their winter jackets – no names mentioned – okay, it was me!! I covered them in every extra piece of clothing or fabric I had. And I was extra thankful for the morning sunrays that were a toasty piece of heaven.

We explored the valley for a while before making our way back down the trail. Then we were greeted by a dead car battery. I was grateful for friendly hikers willing to give me a jump start. Also for my dad for making me carry jumper cables in my car at all times because the other hikers didn’t have any. If you take anything away from this post, take that: Always carry jumper cables in your car!

Even with a few detours to the original plans, I loved every second of our adventure. And I can’t wait to get back to Utah for another one. I definitely recommend backpacking to Whipple Valley!

A white dog and a brown dog looking out at a small stream in a mountain meadow
A brown dog with a green backpack in front of a water soaked mountain meadow

Related Post: What to Pack for a Road Trip with Your Dog

Hiking Emerald Lake in Yoho National Park

​Embarking on what I considered to be our first actual day of adventure, we set off for hiking Emerald Lake in Yoho National Park. The journey there was, of course, spectacular. No amount of rain or stormy weather could diminish the beauty of this wilderness.

View while hiking Emerald Lake in Yoho National Park, looking from behind pine trees at a mountain side, aqua colored lake

Emerald Lake Trailhead

​I pulled into the Emerald Lake parking area and crossed every finger and toe. It looked busy – definitely hoping that what I’d read about the touristy areas was true: 20 feet away from the main viewpoint, you’ll encounter hardly anyone. I saw the trailhead, then off to the left was a bridge leading to several lovely lodge buildings. Fancy. Canada, you are one legit classy broad.

Looking out at Emerald Lake, an aqua colored lake and a resort barely visible through thick pine trees

​But first things first, I had to pee. I spotted an outhouse by the trailhead. Jackpot.

​Let it be noted that not only do Canadian’s have stunning lodges, but their outhouses also are really freaking nice! There may not have been running water or plumbing of any sort, but each one I stopped at was clean and equipped with plenty of TP and hand sanitizer. Small but significant comforts.

I assessed the trail map by the bathrooms and walked back to collect the pups. I didn’t realize it at the time, but this was the start of our new routine: First, park the car. Then stop at the trailhead bathroom. Next, assess the maps. Return to collect the dogs. And finally, hike!

View while hiking Emerald Lake in Yoho National Park, Canada, a white dog and a brown dog looking out at an aqua-colored lake surrounded by pine trees and foggy clouds
View while hiking Emerald Lake in Yoho National Park in Canada, from a viewpoint behind a large rock looking out at an aqua-colored lake and pine trees

Hiking Emerald Lake in Yoho National Park

Emerald Lake Trail: 3.2 miles (5.2 km)​, approximately 2 hours of hiking, minimal elevation

We shimmied past the crowd of people collected by the maps. I chatted with a park ranger for a moment. Then continued down the path. The first thing I noticed was the silence. Or rather, the lack of human noises. It was like everyone had disappeared. Bliss.

​The trail was wide enough for the pups to walk along my sides most of the time. First, the trail was mostly dry, with just a few puddles and muddy sections along the way. The trees blocked most of the rain, not that I minded it too much – nothing could distract me from the scenery!

​Aptly named, Emerald Lake was a vision of color! Standing there, looking directly at it, it was still hard to accept the colors as real. I just stopped and stared many times along the way.

View while hiking Emerald Lake in Yoho National Park in Canada, an aqua-colored lake surrounded by pine trees

​We came across a few other hikers. Many seemed to turn around once they reached the end of the lake opposite the parking lot and trailhead. At first, I wondered if I’d missed something. But it was actually rather convenient because now the trail was getting muddy. I was becoming quite a mess!

The dogs were barreling through not just some but all of the mud puddles. Cool Whip now had brown legs, and if my pants hadn’t been a dark color already, they’d have been brown as well from all the dirt and water the dogs splashed up. Perfect. My car is about to get really dirty!

We made it back to the car just as the rain stopped—a perfect time to brush off some of the mud and give the hooligans a snack.

Hiking along Emerald Lake, Canada, a white dog looking up a mountain trail heading into pine trees
View of a pit bull dog and a woman with short, aqua colored hair in front of a foggy, aqua colored lake

Hiking with Dogs in Yoho National Park

Leashed dogs are welcome on all trails in Yoho National Park unless otherwise noted. Some trails are closed to pets and small groups during times of heavy grizzly bear activity. Be sure to pack poop bags, a water bowl, and water for your hiking adventures.

Related Posts:

What to Pack for a Road Trip with Your Dog

Backpacking to Egypt Lake in Banff National Park

A white pit bull in front of a foggy, aqua colored Emerald Lake
A woman holding the leash of a brown dog looking out at a foggy, aqua colored lake, the standard view when hiking Emerald Lake in Yoho National Park